Lighting Circuits - Connecting a PIR motion sensor with an override switch
Wiring for lights that can either be off, operated by a motion sensor, or permanently on.
Two switches
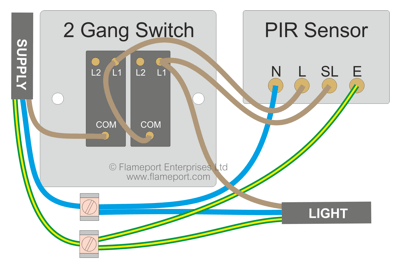
 The cable marked Supply is connected to the consumer unit or some other source of power such as a fused connection unit or plug.
The other cable 'light' is connected to the light fitting. This can be extended to additional lights if required.
Two additional connection terminals are needed at the switch - one for earth, one for neutral. These can be screw terminals or other types such as Wago connectors.
The three Earth wires are connected together in a terminal block.
The three Neutral wires are connected together in another terminal block.
Incoming line connects to COM on one switch. L1 on that switch connects to COM on the other switch and to L at the PIR sensor.
L1 on the second switch connects to SL (switched line) on the PIR, and also to the lighting.
The left switch is the main on/off. In the off position, the lights and sensor are off permanently.
With the left switch on, the PIR is powered and will activate the lights when motion is detected.
If the right switch is also on, the lights are permanently connected to line, and will be always on.
For ease of use, the left switch should be labelled 'OFF/ON' and the right switch 'AUTO/ON'.
One switch
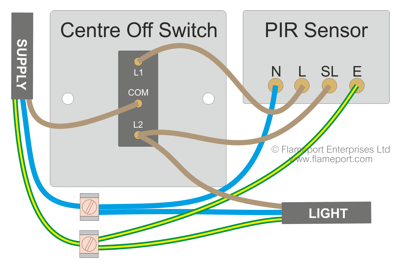
 This requires a 2 position and centre off switch. These are less common, and are usually found as part of a 'grid' wiring range where the switch modules and plates are separate items.
This type of switch has 3 terminals and 3 positions. In the centre position, nothing is connected. In position 1, COM and L1 are connected. In position 2, COM and L2 are connected.
Much of the wiring is the same as described above for the two switches. For this single switch, incoming line connects to COM, L1 to L on the PIR, and SL and the lights connect to L2.
In the centre off position, nothing is connected so the lights and sensor are off permanently.
In the L1 position, the PIR is powered and can activate the lights when motion is detected. L2 at the switch is just being used to connect two wires together.
In the L2 position, the lights are connected to the supply. SL at the PIR is also connected, however this doesn't change anything.
This type of switch should be labelled AUTO-OFF-ON.
Extremely unlikely damage warning
The vast majority of PIR sensors will not be damaged by only connecting SL and not L. Most have a relay inside so the electronics will not be powered via SL. Some electronic switching types may not work correctly when connected in this way - this will not affect the lights being on, but in exceptionally rare cases could damage the PIR. A sensor with a switched relay output is recommended.
Other types of sensor
Microwave motion sensors can be used with these wiring arrangements - the same terminals are used.
Some lights with sensors built in can also be wired this way, provided that both L and SL are available at the light fitting.
In all cases, the total load of all lights connected must be less than the rating of the motion sensor.
Variations
Depending on the location of the sensor and lights it may be more convenient to connect one or more lights directly to the PIR sensor. For both diagrams above, one or more lights can be connected to the PIR sensor N,SL and E terminals.
If two or more sensors are required to operate all of the lights, additional sensors can be connected by extending the N,L,SL,E wiring to additional sensors.
Metal switch or box
The diagrams above are for a plastic switch. If a metal switch is used, an extra piece of wire must be connected from the earth terminal block to the earth terminal on the back of the switch.
Where the backbox is also metal, the terminal in the backbox needs to be connected to the other earth wires.
Video
This video explains the two wiring diagrams above. View on Youtube.


